 |
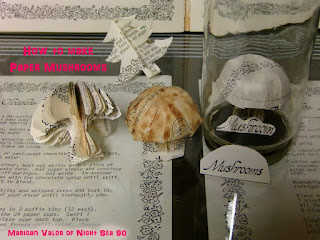
| This is what the base of the mushroom looks like. Created using many pieces cut into a mushroom shape, stapled in the center and spread out to support itself. |
 |
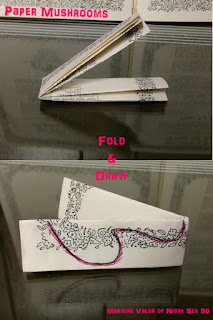
| Final fold and free hand drawn mushroom as an example. |
This is actually the first step, you may need several pages depending on how large your mushroom is. Fold your paper the short way by bending the tall ends together, Repeat several times until you have a long piece about an inch wide or just a bit wider than half your mushroom you plan on. Draw or cut your mushroom out free hand. You can trace and repeat your design for fuller mushrooms. Card-stock would work nicely for larger mushrooms.
These pages are stiffer than printer paper and has a crispness that book pages seem to have if they aren't the ones with floppy paper. I hope I explained that okay. If your paper is sloppier you'll need more to the mushroom and it won't have the strength but if your paper is thicker your mushroom will need to be larger and likely less pages. I hope this helps you find the right pages because I really have no idea how to explain this since I don't really get into paper crafts often enough.
To attach the top cap, I actually glued the stem down on a piece of paper using hot glue to stabilize the mushroom to attach the top which is a large circle cut out of paper, glued to the top with hot glue and cut until you get close to the center but not enough that your slits will end up breaking off. If this happens you can start over with the cap by softening the glue you attached it with by using something hot, a hair dryer, the end of the hot glue gun and remove the circle to attach another.
Take those flaps you created and glue them to the skeleton of the mushroom. Go one by one and overlap the edges of the flaps to create the dome of the cap. As for the glue I used some hot glue which is hot to work with but it's the fastest glue I could think of. I really suggest you use something other than your fingers to press down the flaps of the cap. I used the flat of my scissors but thought that I should have kept a butter knife against a baggie with ice in it to cool down the glue faster so I didn't get impatient and burn my fingers. The baggie would keep the knife from being soaked and ruining the paper.
This finished mushroom was painted for a toasty brown top. I call this type of mushroom a caffeinated mushroom due to the fact that all I used was instant coffee and water. For darker spots you can add dry coffee to the wet spots and wash it away a bit once the rest dries or you can control it better if you just keep adding layers where you want darker areas. I think the coloring gives it a more lifelike look but they look great plain or you could use water colors for a transparent red cap or any other color you want but coffee and books always seem to go so great together.
Disclaimer; Caffeinated mushrooms don't exist in the wild, if they did I'm pretty sure they'd probably be illegal...somehow. Place caffeinated mushrooms in jars to show off as specimens or to give out as gifts to cooks, mushroom lovers, collectors, book readers and coffee lovers. I hope you enjoyed my original craft and design. I'd love to see if you come up with any other types of mushrooms. I created an inspiration board for mushrooms and might try something else soon to add on my shelf next to these mushrooms. Thanks for reading and please share with anyone you think would be interested in this craft project.


No comments:
Post a Comment